I’m Back! Life Update: College

So… it has been almost a month since I have posted. I am ashamed. A lot has happened, but I’m glad to be back. I really missed posting. I’ve had some big changes going on in my life that have required all of my energy and attention. Here’s some background info: So for the last two years I was living with my grandparents in Pennsylvania and attending community college while I tried to figure out what I wanted to do career wise. After I finished four semesters, I decided that I wanted to pursue my degree in  Communications. My twin sister had been attending Neumann University for the last two years. Neumann is a small catholic private college right outside of Philadelphia. I decided that I liked the school and they had a good communications program so I applied, got in, and decided that was where I was going to spend the next two years. Caroline and I have been renting an on campus apartment with two other girls, who she has roomed with for her last two years. Living on campus has been an adjustment for me, and I have been really tired and slightly overwhelmed with all of the new people, campus, and classes. I love my apartment and the girls I live with. I am lucky that we all get a long really well, and we have a really mellow place. The past week was made even more crazy by the fact that I was really sick the previous week, and have basically been recovering while also adjusting to life. But I made it through alive, and have a brand new set up for all of my makeup, and I am thinking that for my next post I will talk about that. So what has been up with you guys?

My new apartment building.. kind of an eyesore

My Skincare Routine

IMG_0320

So in the morning, I basically just wash my face and prime my skin, so I don’t really do anything fancy with my skincare. Before I go to bed at night is when I do my full skin care routine. Before this, I would just wash my face with soap, not even bothering to properly remove my makeup. A few months ago, I started a proper skincare routine. Here are all of the products that I use to keep my face healthy.

Step 1: I remove my makeup either with my Estee Lauder Makeup Remover Lotion, or with makeup removing wipes when I’m feeling lazy.  I love the ED lotion because it is moisturizing and dissolves stubborn makeup.  This is just a sample size, and when I’m finished I probably won’t be repurchasing it as it is expensive. If anyone knows of a similar product they love that is affordable, I would love to hear it!

Step 2: Wash Face. I wash my face after I remove my makeup with Neutrogena Fresh Foaming Cleanser. I bought this recently, and I love it. It is a gentle cleanser so it doesn’t strip moisture away from my skin, but leaves it feeling clean and refreshed. I also love it’s fresh lemony scent.

Step 3:  Tone Skin. Lately I have been getting into spritzing rose water on my skin. I was reading that is a great natural skin softener and that is has calming properties. . You can buy it at any health food store. I keep mine in a spritz bottle and a sometimes reapply it throughout the day. It is very refreshing in the summer.  Next, On a cotton round, I apply Lancome Tonique Confort all over my skin. This is a moisturizing toner with a milky texture, and it smells AMAZING. It calms my skin and it feels so moisturizing. I haven’t found another toner like this one.

Step 4: Serum. I wanted to start using an anti aging product in my regimen because even though I am 20, I noticed that I was getting some fine lines under my eyes and on my forehead. Olay Micro Sculpting serum feels so amazing. It has a really silky texture, a great scent, and makes my skin firmer and softer. I am fresh out of this bottle and am planning on buying another.

Step 5: Moisturize. CeraVe Moisturizing Lotion is my all time favorite moisturizer. I have been using it for a few years on and off and I always go back to this one. I like it because it is super moisturizing but very light feeling when applied. It is also so good for your skin because it has ceramides and is fragrance free. To finish moisturizing I dab on Clinique All About Eyes, which has a cooling sensation that makes my eyes feel refreshed.

Thanks for reading! Tell me about your skincare routine in the comments!

Berry Eyes: An Easy Makeup Look

FullSizeRender (19)

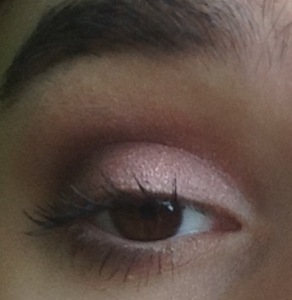
I have been very into the look of deep, cranberry eyes recently, and was inspired by a NYX baked eyeshadow I picked up in the shade Mademoiselle to create a full eye look.  I used a few shades from my Naked 3 Palette, which has pink toned shadows to compliment the main shadow in the look.

What I used:

IMG_0314

Step One: Prime Eyes. I primed my eyes with Elf Shadow lock eye shadow primer. I set the primer with Wet N’ Wild Eye Shadow in Brulee. When I do this, my shadow lasts all day long.

Step 2: I applied nooner from the Naked3 into my crease with a blending brush.

Step 3: Apply NYX Mademoiselle all over my lid ending just before the crease. Since this is a baked shadow, I applied it with a damp brush. Make sure to pack the color on in several layers for the best payoff.

Step 4: Allow the shadow several moments to dry. Mix Nooner and Limit from Naked 3 to blend out harsh lines from the NYX shadow. Take Nooner and Limit and smudge on the lower lashline.

Step 5: Pack Blackheart onto the outer 4th of eye, then blend so it looks more natural. Repeat this step several times to get the desired amount of pigmentation from the shadow.

Step 6: Create a thin to medium line using a black eye liner. I used Maybelline Master Precise Eye Liner. I also added a black eyeliner to the lower waterline to make my eyes pop. I then added several layers of mascara, and the look was complete!

FullSizeRender (18)

Wet N’ Wild Comfort Zone Palette Review

FullSizeRender (15)

I finally caved and bought the Wet N’ Wild Comfort Zone Palette. It wasn’t really hard seeing has it only cost $5. I had heard its praises sung on the internet for ages now, and I finally decided that it was time I add it to my own collection. I am glad that I did. It is a beautiful palette of silky, pigmented eye-shadows, and it has some truly unique shades. Here is a breakdown of the palette:

Color Selection– This palette has some really pretty neutral colors in it, that are completely wearable for everyday. The entire first row and the first shadow in the second column are all beautiful neutrals that give higher end palette neutrals a run for their money. The last three shadows are more green based. There is a light, pea green and a dark brown forest green. The last shade in the palette is a complete stand out for me. It is a brown shade with blue and green flecks in it. When it is swatched it is so beautiful and has a duo-chrome like finish. It reminds me a lot of Mac’s Blue Brown Pigment. So cool.

FullSizeRender (16)

Finishes– Every shade in this palette is metallic, meaning they all have shimmer in them. The dark shades tend to have larger glitter particles in them than the lighter shades. I would have liked if the palette had one matte shade, but I find that they still work well for crease and transition colors. Because they are shimmery, every color in the palette would make a pretty all-over lid color.

Pigmentation– Like most Wet N’ Wild eye shadows I have tried, this has great pigmentation. Lightly touching your brush to each shade is enough to cover most of your lids, and you can pack more on depending on the amount of coverage you are looking for.

Fallout- This palette has some light fallout on several of the shades, but this is to be expected with even high end eye shadows. It is nothing that is not manageable, and can be swept away easily with a clean brush.

So far, I am really happy with this palette. It is a great value at only $5, and you get a lot of product for your money. I like that this palette has some safe neutral colors for every day, but some fun green shades for when you feel like experimenting. I can see myself using this palette a lot, as it is a good product that I would definitely recommend to my readers.

FullSizeRender (17)A look I came up with while playing around today

If you have this palette, what do you think about it? Tell me in the comments!

July Beauty Favorites

IMG_0197[1]

So, July is gone, and I am already mentally preparing myself for back to college at the end of August. Here are all of the makeup items that I loved last month.

1.) NYX Soft Matte Lip Cream in Cannes– I have finally tried this product and I realize why everyone loves it so much. The formula is really comfortable as far as a matte liquid lipstick goes, and Cannes is the ultimate your-lips-but-better shade. I have already picked this up in another color, Istanbul, and I plan to get more.

2.) Neutrogena Healthy Skin Foundation– I have found it. I have found the foundation I have been looking for. Earlier in the month I decided that I wanted something with sheer coverage. I was thinking about buying Nars Sheer Glow, but then a friend told me that this was a dupe for it.. Now I can’t speak to that, since I have never tried SG, but I don’t plan on bothering with it since this is amazing and WAY cheaper. It has a really natural finish and the perfect amount of coverage. It is my new favorite, and I don’t think I will be buying any new foundations in the near future since I am so happy with this.

3.) MAC Blush in Blush All Day– I know, this is the dumbest name for a blush, but it is my go to shade for days when I am wearing natural makeup. It is a light, peachy blush with a slight shimmer to it. It pairs really well with bronzer as it shares some of the same deeper tan tones, so it is the perfect summer blush.

4.) Tarte Bronzer in Park Avenue Princess–  This was one of the rare instances where I got something I had really been wanting in my Ipsy bag.  In this month’s bag I received a deluxe sample of this popular Tarte Bronzer, and this is actually the first Tarte product I have ever owned. I like this bronzer because it is ideal for people like me who are very fair, as it just adds a light wash of color. The staying power is also fantastic.

5.) Lorac Pro Palette– I saved the best for last. I have been wanting this palette for MONTHS and I finally decided it was time to get it. I am so glad I did. I knew before I bought it that I would love this palette. It is seriously the ultimate neutral eye shadow palette EVER. It has all the neutral shades you could ask for. I love that there is a matte row and a row of shimmery shadows. The colors are SO pigmented and SO blendeable. If you have not tried Lorac eye shadows, you need to. They just have the softest, most blendeable formulas ever. This was such a great purchase, as it just has every neutral staple you need to build your collection. And just look at those colors!

IMG_0194[1]What have you been loving this month?

Taylor Swift 1989 Tour

IMG_0102[1]

One of the most consistent things in my life has been Taylor Swift. I have been obsessed since some seven-odd years ago, when I first heard Love Story come on over my radio. The rest is history. I have awaited each new album release with bated breath. Each record has been a soundtrack to the following two years until she released another one and I am transported back to middle school, my sophomore and senior years of high school, and my sophomore year of college with each play. I have been a loyal fan and fierce defender of Taylor, and I love her and the beautiful music she makes. I am lucky enough to have two sisters and one best friend, who not only understand my obsession with Taylor, but who are just as obsessed as me. In 2013, we went to her Red Tour as my first Taylor concert. It was absolutely magical and I knew without a doubt that I would be going to her next tour. So in October, we all bought concert tickets that we couldn’t quite afford, and got on with our regular lives, but with the show constantly in the back of our minds. July creeped up quickly, and soon enough it was time. Me, my twin sister Caroline, my little sister, Juliet, and my best friend, so appropriately named Taylor, all got ready together. I did everyone’s eye makeup upon their request. We had to drive two states away to get to Foxboro, Massachusetts, where the concert was being held at Gillette Stadium (Home of the Patriots). This was the same venue we went to last time, and just like two years ago, it was raining. Luckily, the rain died down and it stayed pretty clear the rest of the night. My straightened hair was complete history, however. We got there pretty early and walked around, before we went to our seats at the very top of the stadium. Even though our seats were really far away, I didn’t care. I was just glad that we were able to go. Shawn Mendes and Vance Joy opened, and the HAIM, which was super exciting as they are one of my favorite bands. Taylor went on around 9:40 and completely rocked my world. I was basically dying when she emerged on the stage. She sang every single song on the album, as well as some old favorites. At the beginning of the show we were given bracelets that lit up during the show at certain points, and you could literally see every one of the 60,000 people in the stadium. It made the show even more fun. She was also joined by Walk the Moon at one point, and they sang their song “Shut up and Dance with me” which was amazing. We all danced all night until we were completely exhausted. It was a really memorable night, and I am so grateful that I was able to go. I decided not to take any pictures during the show because our seats were not close enough to get a close image, and I just wanted to enjoy the show.

IMG_0114[1]Taylor and I

IMG_0115[1]

Before the show

Mauve Eye Makeup Tutorial Featuring the Urban Decay Naked 3!

FullSizeRender (13)

Happy Sunday everyone! I thought I would share with you a look I created yesterday with my Urban Decay Naked 3 Palette. I know that the Naked Smokey Palette is everywhere right now, and since I still don’t have that (I don’t want to talk about it) I thought I should bring out my Naked 3, which I hadn’t played with in a while.

naked 3

Steps:

1.) Prime Eye Lids. I used Maybelline Color Tattoo in the shade Inked in Pink, as it create a perfect base for the pink toned colors in the palette.

2.) With a fluffy crease brush, blend nooner into your crease. Blend out any harsh lines with Limit.

3.) With a flat shader brush, pack Burnout all over your lid.

4.) With a crease brush, add Liar to the outer third of your eye. Deepen that by blending factory on the outer v and crease. Blend it all out with a brush with no additional product.

5.) Use Dust to highlight the inner corner of the eye.

6.) Use Strange to highlight the browbone

7.) Smoke out the lower lashline by applying Nooner with a pencil Brush.

I used my sample of Le Volum de Chanel Mascara on my upper and lower lashes, and used Nyx wonder pencil on my lower waterline. All done!

FullSizeRender (14)

I hope you enjoyed this look! Leave a comment below telling my your thoughts!

Elf Brushes Everyone Should Own

IMG_4910[1]

Hi everybody! I’m back today with a post about makeup brushes. It is incredible important for any makeup lover to have a set of good brushes in their collection. However, quality makeup brushes tend to be pricey, and not everyone can afford to buy all of the brushes they need. That is why I love Elf brushes. They are incredible quality for an extremely low price, and I rely on them every day to create any makeup look that I am wearing. Here are the best Elf brushes that make it easy to build up your brush collection without breaking the bank.

IMG_4900[1]

Elf Complexion Brush, $3

This is my favorite of all of my Elf brushes. It is a fluffy brush that is slightly flat on each side. It is perfect for applying bronzers and blush. I love how expensive and luxurious it feels.

IMG_4903[1]Powder Brush, $3

This is a unique brush, and I don’t own anything else like it. It is a densely packed brush with the bristles cut flat at the top. It is perfect because it hold a lot of powder, but then releases it when you dab it onto your face. It is the only brush I use for applying powder foundations, loose powders, and finishing powders.

IMG_4904[1]Small Stipple Brush, $3

This brush is great for blending concealer, cream contour, and also for applying cream blushes.

IMG_4905[1]Blush Brush $3

I don’t use this brush for blush, as is it’s purpose, because I find it is too small for that. However, the tapered, small top is perfect for setting under eye concealer, and applying highlighter to the cheekbones.

IMG_4907[1]Ultimate Blending Brush, $6

This really is exactly what the name states. This has become my go to brush for applying foundation, taking the place of my beloved beauty blender. It is a really quality brush, with densely packed brushes, slightly domed. It applies foundation completely flawlessly and gives my such nice coverage.

IMG_4909[1]Professional Eyeshadow Brush, $1

This is a really basic eyeshadow brush, but it gets the job done. It is a flat shader brush that packs on a lot of color. ANd it cant be beat at $1!

IMG_4908[1]Small Angled Brush, $3

Don’t feel the need to spend a lot of money on something as basic as an angled brush. This is my go to brush for filling in my eyebrows, and I use it with my Anastasia Dipbrow Pomade, and it works great.

Thank you for reading! What are some of your favorite makeup brushes?

Face of the Day: Minimal Makeup & Dewy Skin

IMG_4861[1]

So today was just one of those days where I didn’t feel like fussing with a lot of makeup. I was just running basic errands today and not doing much of anything else, so I went for a fresh faced look that looked like I really wasn’t wearing any makeup.

IMG_4862[1]

First, I primed my skin with Loreal Magic Lumi Illuminating Primer. This is my go to primer when I want fresh looking dewy skin, because it has a pearlescent, glowing finish that looks really natural under makeup.  After that I used my favorite Estee Lauder Perfectionist Foundation, which is a moisturizing foundation that always leaves my skin looking like it’s naturally flawless. I had to cover up my dark circles, with my NYX Dark Circle Eraser, which is a brightening concealer that naturally illuminates the under eye area. To set that, I used my NYX HD Setting Powder in Banana, and just a bit of Rimmel Stay Matte Powder in Translucent to set all my foundation. I used my Benefit Hoola Bronzer lightly under my cheekbones, and on my jawline and the sides of my nose. This is a matte bronzer, so it looks like a natural tan. Whenever I want a dewy look, I always use a cream blush, because it doesn’t have a cakey powdery finish, and looks very organic. I used my Maybelline Dream Bouncy Blush in the shade Pink Frosting.  I then took a bit more of the primer and added it to my cheekbones to illuminate, which really was essential to this look. I kept the eyes very simple, just using my NYX Eyeshadow Base in Skin Color, to cancel out redness on my eyelids. I did not add any eyeshadow, as I wanted the focus to be on my skin. I did a quick Swipe of Maybelline Mega Plush Mascara, which I find to be very natural looking, as it separates lashes and doesn’t clump. Then, I went for my Revlon Lip Butter in the shade Peach Parfait, which is a natural peach color. And that’s it! What do you do on days when you want to look natural?

Quick Update

IMG_4847[1]

Hi everyone! I hope everyone had a great 4th of July weekend. I just wanted to quickly tell you what I’ve been up to, and why I haven’t posted in the last few days. I normally post three times a week or more, but things have been pretty busy. My dad has been away in Texas, and while he was gone, my dog, Jack, got really sick. We took him to the vet, and he was diagnosed with Addison’s disease, which is a disease that attacks the adrenal gland in the body. To keep things brief, it just means that his body is not producing the hormones that it needs, and it makes him really sick. We were not sure if he was going to live or not, and it was extremely stressful. I checked on him about every five seconds to make sure that he was breathing, but he was barely moving and we were afraid he could die. He finally was able to get treated at the vet the other day, and he jumped back to his old self almost immediately with the medicine they gave him. We know now that he is going to be okay, but it has been extremely stressful having to deal with all of this without my dad here. Jack will have to get a shot every month for the rest of his life, which is a lot, since he is a young job. It will be expensive, but worth it. I am so glad that he is okay, and now that things seem to be back to normal, I will be back with some fun new material on my blog. Thanks for reading!

IMG_4823[1]